Update 2018-11-12
It appears a recent Steam update broke the way I was originally launching Steam via the scheduled task. I’ve updated the post accordingly with a different method of accomplishing the same task.
Original Post
I recently started making an effort to make sure all of my digital purchases are backed up. Apps, eBooks, Music and Comics are fairly easy to deal with plus I don’t have much as compared to my Steam library.
My Steam library, while compared to other people, might not be huge but it’s the single largest collection of digital content I own and have zero backups of it. In my case my library totals around $6000 as of this writing and based on the ever fluctuation price of content on Steam.
Steam itself offers a method for backing up your games. You launch Stream, install a game and then click ‘Steam’ in the top left and ‘Backup and Restore Programs’. You’re then presented with a wizard that will guide you through the process of backing up your selected games. The flaws with this system are that it’s manual, would need to be re-run every time a game was updated if you care about having the latest patched version and requires you to install every single game in your library.
The solution I’ve come up with still requires you to have all of your games installed locally but it does address the rest of the problems.
I found this utility called “The Steam Backup Tool” (latest version mirrored locally just in case) which takes care of the majority of the automation part of this process.
Here is how I set everything up.
First I needed storage equal to double my Steam Library, half for the library itself and half for the backups. In reality I’ll need less but this is a good starting point. I used Steam Gauge to figure out my library is 2.29TB. I have a 4TB USB hard drive lying around, that should just barely do the trick.
Second I needed something to run all of this off of. Fortunately for me I have a homelab and a dedicated system for backing up all of my personal computers and my homelab itself. The system is a small form factor PC with a Core i3-8100, 16GB of RAM and is running Windows Server 2016 Standard. You can accomplish the same thing with any old laptop, desktop or even just use your gaming rig. It just needs to be powerful enough to run Windows 7 (or newer) and Steam. You can just use your gaming rig if you leave it on 24/7 and have all of your Steam games installed on it. I only install the games I’m playing or have yet to play on my gaming rig which is why I’m using a separate system.
Now that I have everything I need I got started:
- I attached the USB drive to the system I am going to use to store all of my Steam games and perform the backups
- I formatted the USB drive with NTFS
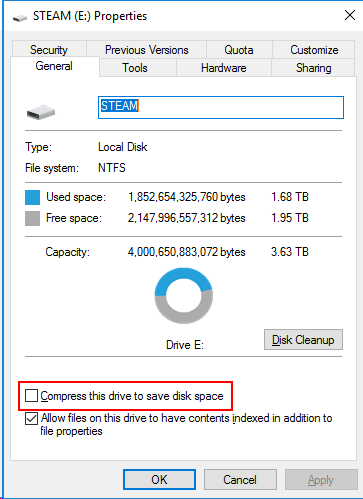
- (Optional) If you want to make your storage got further and don’t mind a performance impact you can enable compression. To enable compression right click the drive, choose properties, and check mark ‘Compress this drive to save disk space’. I recommend doing this before you start downloading your Steam library. Since I’m using Windows Server 2016 and not a regular version of Windows I chose to do something different. More on that here.
- I then downloaded and installed the Steam client on the USB drive and logged into it
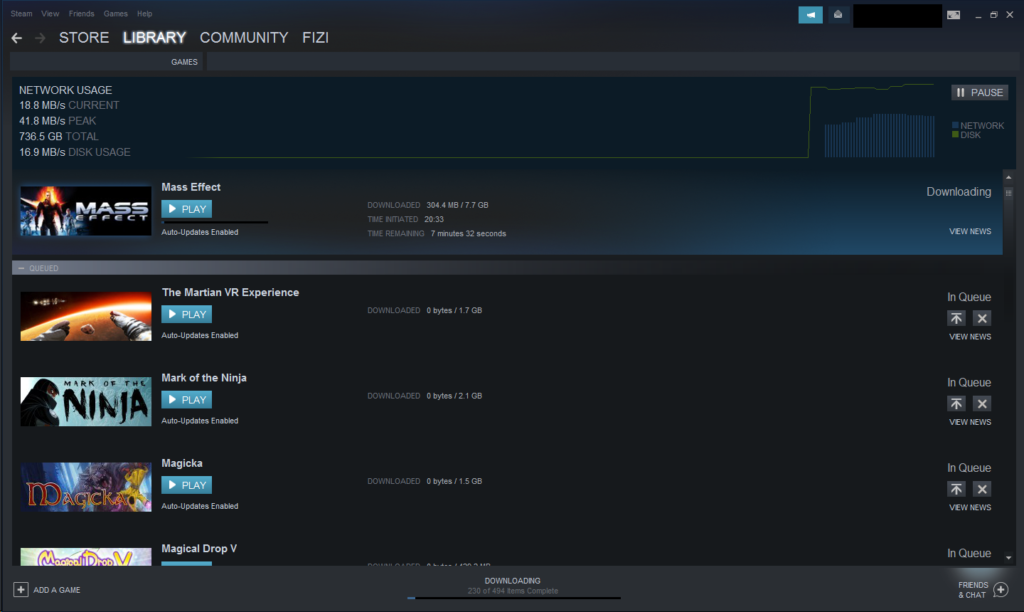
- I then queued up every single game in my library to download/install and waited…… like three days
While the download was happening I did some quick testing and confirmed that I can have Steam running on a second PC in my home downloading games and still use Steam on my gaming rig to play games. This is ideal because now I don’t have to worry about scheduling game updates to occur on the backup server when I most likely won’t be play games on my gaming rig.
Three days later my entire library was downloaded and I can get into the automation part. We need to accomplish a few things:
- Automatically launch Steam on a schedule so games will patch and then
gracefullyexit Steam upon completion - Run The Steam Backup Tool against the Steam library so new games are backed up and games that were patched are re-backed up
To accomplish #1 I chose to use Windows Tasks.
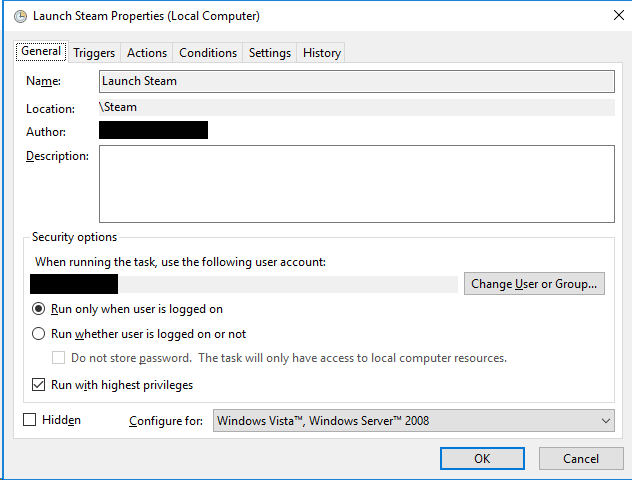
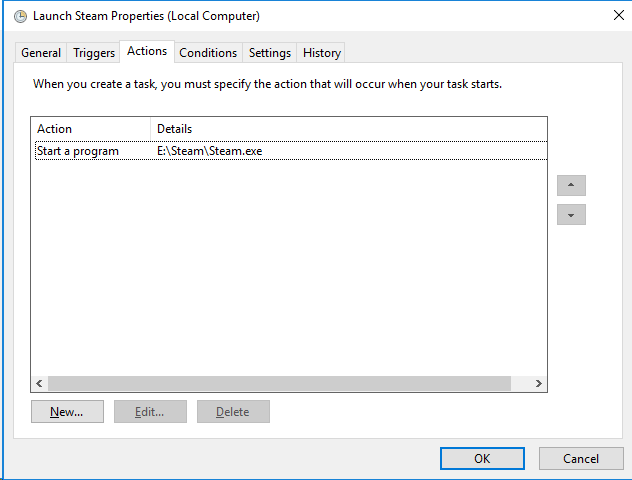
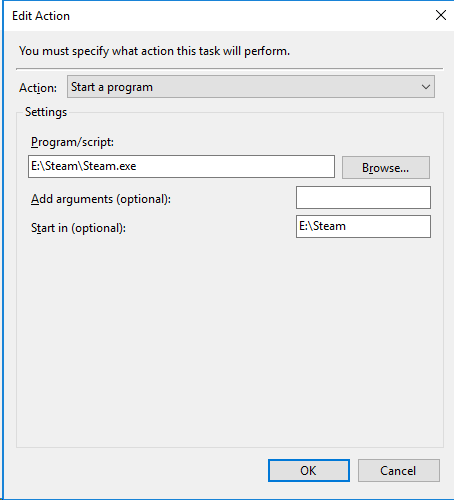
Launching Steam is straight forward, just create a scheduled task in Windows that launches “<STEAM PATH>\Steam.exe” and be sure to configure the task to ‘Run only when the user is logged on’. I set mine to run at 9:00am on Monday. This will take care of automatically starting Steam, letting updates download over the next few days.
After the task was created I disabled it (right click, disable). I want to run a full backup of everything first before enabling the automatic start/exit of Steam. The first full backup is going to take a long time and if Steam launches while it’s running bad things will likely happen.
To accomplish #2 I again chose to use Windows Tasks and some PowerShell.
I decided I am going to backup my Steam games to the same drive they are installed on. This is because my backup software (Veeam) can then copy those files to my actual backup hard drive giving me the advantage of compression, deduplication, proper incrementals and the ability to replicate the data later to the cloud all using the Veeam software. This ends up wasting a ton of storage but that’s fine for my use case. This 4TB hard drive I’m using has been doing nothing for a year. For the average person you’re probably going to want to choose a different location to save your backups.
The Steam Backup Tool has a command line (or CLI) version of it’s executable. The flags are:
usage: steamBackupCLI [options]

Parameters:
  -h, -?, --help             show this message and exit.
  -O, --out-dir=VALUE        (required) Set backup directory
  -S, --steam-dir=VALUE      Do not automatically detect Steam directory, use
                               this directory instead
  -2, --lzma2                Use LZMA2 compression.
  -C, --compression=VALUE    Set compression level. Possible values 0 - 5:
                                0 : Copy
                                1 : Fastest
                                2 : Fast
                                3 : Normal
                                4 : Maximum
                                5 : Ultra
  -B, --backup               Update backup
                               Update games that have been changed since the
                               last backup, EXCLUDING games that have not been
                               backed up yet.
  -L, --library              Update library
                               Update games that have been changed since the
                               last backup, INCLUDING games that have not been
                               backed up yet.
  -D, --delete               Delete all backup files before starting
                               ignored when either update library or update
                               backup parameter is used
  -T, --threads=VALUE        Thread count
                               LZMA:  number of concurrent instances,
                               LZMA2: number of threads used
The backup command I settled on is:
C:\Program Files (x86)\Steam Backup Tool\v1_8_6\steamBackupCLI.exe -O E:\Steam-Backups -S E:\Steam -2 -C 5 -L -T 2
I chose to use LZMA2 compression [-2] (because why not), Ultra compression [-C 5] because I don’t care how long this takes and want the least amount of disk space to be used, I want anything newly installed to get backed up and anything that’s been patched to be re-backed up [-L] and I limited the backup to 2 threads [-T 2] because server I am running this on only has 4 threads and I want to leave 2 for the OS and Veeam to be able to continue doing their job while these backups run.
The next part was a bit tricky to figure out due to the design of SteamBackupCLI.exe. It turns out the application is expecting a command prompt or PowerShell console window to be created when it runs so it can resize the window and dump all of it’s output to the screen. Trying to run SteamBackupCLI in the background is a no-go which makes it slightly annoying to get running in an automated fashion but not impossible. I’ve submitted a bug to the developer in hopes they will update SteamBackupCLI and offer a command line flag to dump all output to a log file instead of expecting a console window to be opened.
What this means for us is we have to remain logged in to the system that is going to run SteamBackupCLI. In my case I use Remote Desktop (RD) to get into my server so all I need to do is login to the server after a reboot and just click the ‘x’ to close RD with out actually logging out. If you’re using your regular desktop you need to do is make sure you log into as the user running the backup task after a reboot. You can likely “switch desktops” or lock the screen and everything will continue to function but I have not tested this.
Here is the PowerShell script I wrote to kill Steam, wait 30 seconds and then start SteamBackupCLI minimized:
Get-Process -Name "Steam" | Stop-Process -Force
Start-Sleep -Seconds 30
cd "C:\Program Files (x86)\Steam Backup Tool\v1_8_6\"
start powershell -WindowStyle Minimized ".\steamBackupCLI.exe -O E:\Steam-Backups -S E:\Steam -2 -C 5 -L -T 2"
This script assumes you installed Steam Backup Tool in “C:\Program Files (x86)\Steam Backup Tool\v1_8_6\“. If you didn’t, update the 3rd line of this script accordingly.
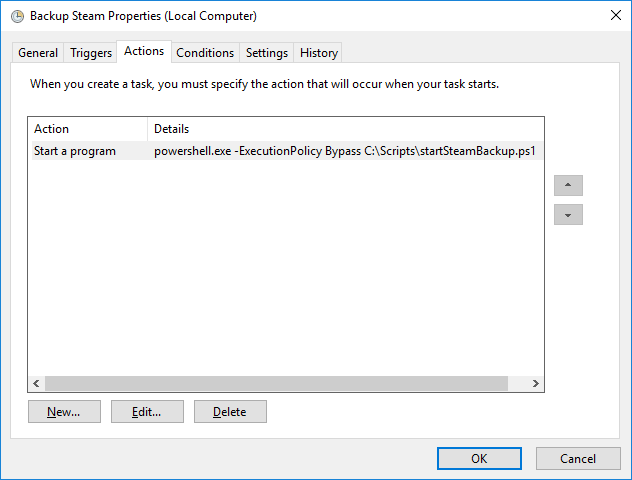
I saved this script as “startSteamBackup.ps1” in “C:\Scripts” on my system. You can save it anywhere you want, just remember where.
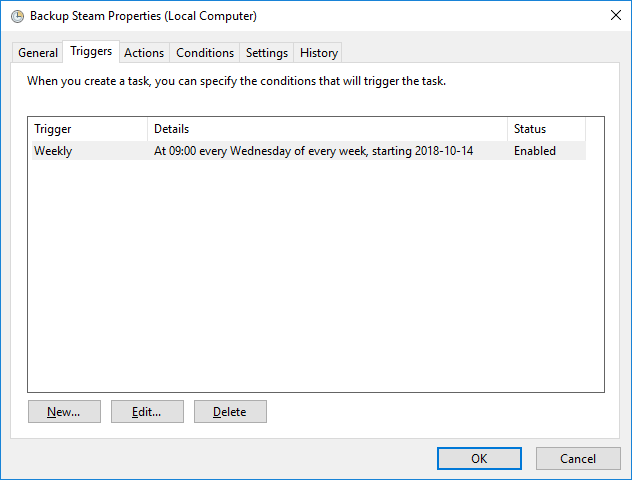
I configured the backup to run on Wednesday at 9:00am which will give the backup 4 days to run before Steam will try to launch itself again on Monday. It is very important with this task that you select ‘Run only when the user is logged on’. If you choose the other option this task will crash on launch as mentioned earlier in this post.
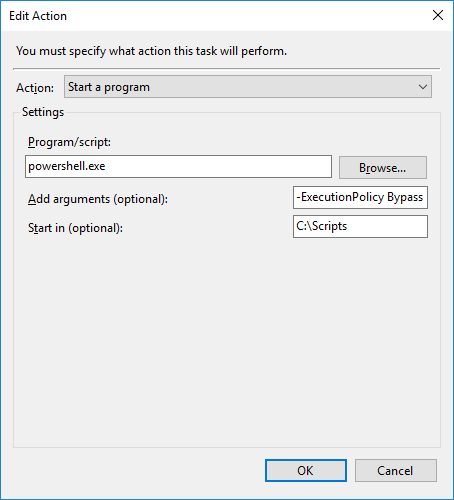
The parameters in the last screenshot are:
Program/script: powershell.exe
Add arguments (optional): -ExecutionPolicy Bypass C:\Scripts\startSteamBackup.ps1
Start in (optional): C:\Scripts
After the task was created I disabled it (right click, disable).
Before enabling the scheduled tasks I manually ran the backup command “steamBackupCLI.exe -O E:\Steam-Backups -S E:\Steam -2 -C 5 -L -T 2” once since this was going to take longer than the 4 days I’m allowing with the schedule. Once the initial backup was done I then enabled both tasks (right click, enable).
(Bonus) Using deduplication instead of compression
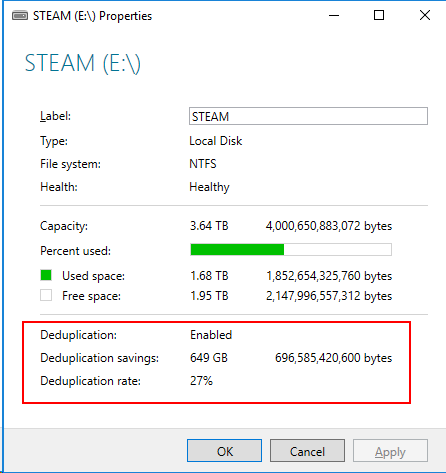
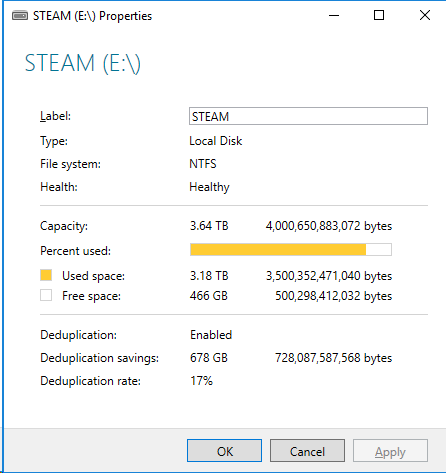
Since I’m running this on Windows Server 2016 I have the option to use deduplication instead of compression. De-duplication occurs on a schedule you set and I believe is less CPU intensive than compression. I do not know if it’s more efficient though. My results were fairly impressive with roughly 27% of my Steam library being redundant data that could be deduplicated.
Update 2018-11-10
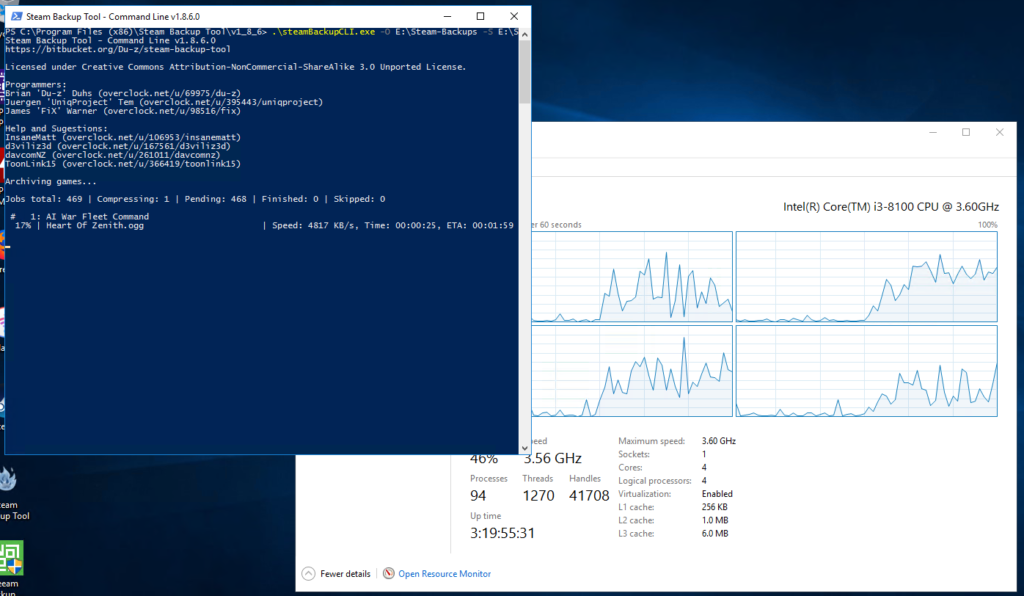
After one full run of backups



I want to do something similar. Is this still working for you?
It was working fine for me until I stopped doing it.
Steam had a massive outage a while back and offline mode didn’t even work to play downloaded and installed games. Their support people didn’t provide me a very satisfactory response as to why I couldn’t play installed games in offline mode during their outage so I no longer trust these backups will be useful if Steam/Valve went under.
Hey, how would you back-up non-steam games that were added to steam library? Would love to find out how to do it in bulk, instead of one-by-one
I never got that deep into it to be honest. The only platform I used at the time of this blog post was Steam. I’ve since branched out to others, GoG I manually download the backups, move them to a share and tag them as backed up in GoG Galaxy. I rarely buy games from GoG so doing this by hand is not a big deal.
I gave up backing up Steam completely. I have no idea if this even still works :D
All other platforms like Epic, etc. I just get their free games and don’t care about backing them up since I never paid for them anyway.